Upgrading the sound system is usually one of the first modifications attempted when we talk about car customization.
Begining with the head unit, I would suggest buying the stereo wiring harness for your vehicle application. This will make the installation easier for you if you are a beginner, and it allows for easier replacement of the stock radio (if you choose to sell the vehicle in the future) and swaping or upgrading to a different aftermarket head unit.
Begin by disconnecting the negative battery cable from the battery. This will ensure that you don't accidentally cross any wires and burn out a new piece of equipment. Next, remove the old head unit. If you need to see how this is done on your specific vehicle, you can look up your vehicles application on installdr.com. This is a great resource for seeing pictures of how to remove the head unit. Once it is loose, disconnect the wiring harness and the antenna from the head unit and remove it completely.
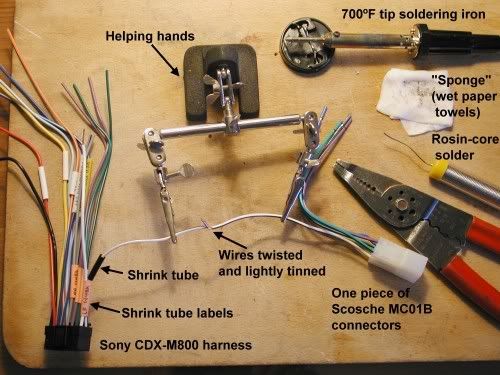
Once you have obtained the wiring harness, you will notice the color coded wires in the back of the head unit. The head unit wires and the wiring harness wires will be partially spliced for easy installation. There are several good ways to connect the wires. One way is to use butt connectors, which crimp the wires within a connector. These can be picked up almost anywhere that sells/installs head units, walmart, etc. My favorite way requires a soldering iron and heat shrinking sleeves. Twist the wires together tightly, and fold them over paralell to one of the wires. Apply just enough solder to weld the two wires together. Then slide the sleeve over the connection and heat it with a heat gun or good hair dryer. I have had to rewire or repair systems where butt connectors were used, but this could be installer error, and not a problem with the connectors themselves. I have never had any of the soldered connections fail.
Once all the connections are made, and the sleeves heated and shrunk in place, I like to take a zip tie and tie them all together. Connect the wiring harness of the head unit to the wiring harness connected to the vehicle. Plug in the antenna (you may find you need an antenna adapter in some applications). Now slide the head unit in place, but don't attach it yet. Reconnect the negative battery cable and turn on the head unit (make sure the key is turned to the ACC postion). It should be functioning properly at this point. If you plan on adding an amp, or have purchased one for this setup, turn the unit off and connect the RCA cables. Run them through the dash to the floorboard and to the amp (more on how to successfully do this in future post).
If you encounter problems, you can email support@majesticmodifications.com for help.

