Friday, February 23, 2007

Car Audio Installations - The secret to door panels!

For some, the prospect of changing out speakers is a daunting one, since you have to remove the door panels to access the speakers tucked away within its walls. They are not a tricky as they seem, if you know the right techniques. The first thing to do is to locate any screws holding the panel in place. These are generally found in or under the armrest piece, in the door opener latch, or near the bottom of the door panel. Remove as many as you can find to start.


With the screws removed, you will need to carefullfy pry the door panel off the door. Start in the bottom corner nearest the speaker. Gently pull the panel until it pops loose. There are usually several clips holding it in place. Work around the bottom of the door panel popping the clips out. Be careful to not break them, because you will beed them to reinstall it. Continue around the outside of the panel until you have removed as many of the clips as you can. If you have power windows, doors, etc, remove the control panel from the door panel. It is usually clipped in place, and can be carefully pried out. Look for small notches that may give away the position of the clips. If you have mechanical windows, you will need to push the door panel into the door at the window crank, and look for the snap ring clip holding it in place. With a thin flathead screwdriver, pop the clip loose, taking special note of where it goes, as you will need it to secure the piece back in place. Once this is removed, you should have enough clearance to reach the speaker. If not, you can attempt to completely remove the door panel by sliding it upwards and out of the window compartment. You may be caught up by the door opener latch. These can be a little tricky, as some will slide in place horizontally, screw in, or pop out. Look for screws, and if you don't find any, try sliding it horizontally towards the inside. If that doesn't work, see if it pops straight out. it will be connected to the bars that pull the door latch, so they will have to be positioned correctly for the door panel to be removed. If there is a triangular piece of trim in the top corner of the door panel, you will need to remove it also. It also clips in place and can be removed. This should allow the door panel to slide out, assuming you have disconnected the control panels electrical wires.


You should now be in full view of the door speakers. It can be removed by removing the four screws holding it in place. You may also find that the connectors on these speakers won't work for your aftermarket ones, so you will have to clip the wires and attach the end connectors provided with your speakers. Pay attention to positive and negative here. if you are unsure of what is what, there are a few ways to check. Look at the terminals on the factory speaker. it may have a "+" and "-" sign designating positive and negative. If it doesn't tell you, you can log on to installdr.com and look up the color codes for the speaker, or try the battery test. Take a good charged battery and place one of the factory speaker wires on the positive, and one on the negative of the battery. If the speaker pushes out, the polarity is correct as you have it, and attach the wires accordingly. If it pushes in, the polarity is reversed, so reverse the batter and try again. If it pushes out, wire the speakers following that polarity.


Install the speaker in the door by replacing the 4 screws and securing it in place, and reinstalling the door panel. be sure to slide it back down in place, and line up the clips exactly before applying pressure to reattach them. You don't want to break any of those. Finish screwing the door in place, then attach the window control panel/window crank, and congratulations, your done!


If you run into problems with your door panels, you can contact us at support@majesticmodifications.com for assistance.

Monday, January 29, 2007

Test Lights vs Multimeters

I have been to a lot of car audio shops that use test lights, and not as many that use digital multimeters. Is one really "better" than the other for finding power sources?

Absolutely! A test light looks like a screwdriver with a sharp pointed end, and consist of a small bulb and a grounding wire or cable. It works by grounding the bulb, and once it comes in contact with a power source, it will complete the circuit and light the bulb. This is the easiest way to test power because the bulb either lights up for power of doesn't if their isn't any power.

The problem with using this type of testing on todays vehicles is the complexity of some of the circuits inside the dash. When you complete the test light circuit on a "hot" wire, you essentially create a small "arc" of electricy that can short some of the more sensitive equipment such as an air bag sensor or relay. I have actually seen one installer blow the airbags out of a new BMW M3 by testing wires with a test light. In most cases, it won't cause any harm, but when it does the cost can be very high.


I highly reccomend using a digital multimeter to test circuits. The are very accurate and can tell you a lot of useful information such as voltage, amps, and ohms, all of which are essential to know when building a good sound system.

These multimeters work a little differently than a standard test light. they typically have a battery on board to power the meter, so they dont pull power from the power source, reducing the tendencies to "arc" the power source. They are generally safer to use on sentitive systems than their test light counterparts for this reason.

Digital Multimeters are a great tool for car audio installers, as they can help track down problems in the system. A test light will light up under power, but wont tell you if you are getting the proper voltage and amps. With a multimeter, you can start at the component taking readings, and work your way backwards until you find the component that is not functioning properly.

Multimeters range from about $10.00 to over $100.00, and depending on your level of work and how accurate you need to be, you can find one that will work for you. They are a great investment, and will save a lot of headache when you are problem solving a system.

More info on how to track down problems in your car audio system using a digital multimeter is coming soon...

Wednesday, January 3, 2007

Head Units

Installing Head Units/CD Players

Photobucket - Video and Image Hosting


Upgrading the sound system is usually one of the first modifications attempted when we talk about car customization.

Begining with the head unit, I would suggest buying the stereo wiring harness for your vehicle application. This will make the installation easier for you if you are a beginner, and it allows for easier replacement of the stock radio (if you choose to sell the vehicle in the future) and swaping or upgrading to a different aftermarket head unit.

Begin by disconnecting the negative battery cable from the battery. This will ensure that you don't accidentally cross any wires and burn out a new piece of equipment. Next, remove the old head unit. If you need to see how this is done on your specific vehicle, you can look up your vehicles application on installdr.com. This is a great resource for seeing pictures of how to remove the head unit. Once it is loose, disconnect the wiring harness and the antenna from the head unit and remove it completely.

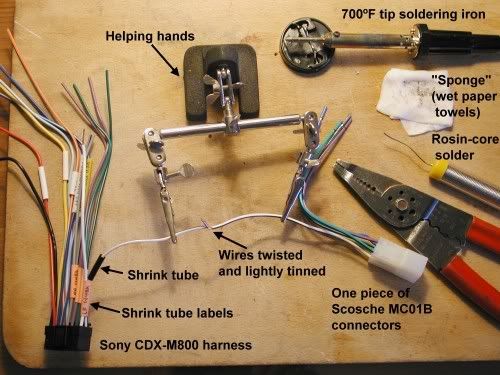
Once you have obtained the wiring harness, you will notice the color coded wires in the back of the head unit. The head unit wires and the wiring harness wires will be partially spliced for easy installation. There are several good ways to connect the wires. One way is to use butt connectors, which crimp the wires within a connector. These can be picked up almost anywhere that sells/installs head units, walmart, etc. My favorite way requires a soldering iron and heat shrinking sleeves. Twist the wires together tightly, and fold them over paralell to one of the wires. Apply just enough solder to weld the two wires together. Then slide the sleeve over the connection and heat it with a heat gun or good hair dryer. I have had to rewire or repair systems where butt connectors were used, but this could be installer error, and not a problem with the connectors themselves. I have never had any of the soldered connections fail.

Once all the connections are made, and the sleeves heated and shrunk in place, I like to take a zip tie and tie them all together. Connect the wiring harness of the head unit to the wiring harness connected to the vehicle. Plug in the antenna (you may find you need an antenna adapter in some applications). Now slide the head unit in place, but don't attach it yet. Reconnect the negative battery cable and turn on the head unit (make sure the key is turned to the ACC postion). It should be functioning properly at this point. If you plan on adding an amp, or have purchased one for this setup, turn the unit off and connect the RCA cables. Run them through the dash to the floorboard and to the amp (more on how to successfully do this in future post).

If you encounter problems, you can email support@majesticmodifications.com for help.